Please Note:
This information is taken directly from the Coyote
Service Book, as supplied with the bike. I have removed
a couple of bits of information that are irrelevant
to the XC2.
1. IMPORTANT NOTES
It is imperative to adhere to the instructions prescribed in
this manual. FASTRAX and COYOTE strongly reccomends that service
be performed by an authorised dealer, with proper equipment.
Failure to comply may result in improper installation, causing
injury, and voiding warranty.
If the shock ever loses oil or if it makes sounds of excessive
topping out, stop riding the bicycle immediately and have the
shock inspected by a dealer. Continuing to ride with the shock
in either of these conditions could result in loss of control
of the bicycle with possible serious and/or fatal injuries.
2. TUNING YOUR REAR SHOCK
By matching the proper spring rate and damping adjustment,
Fastrax shocks can be tuned to your particular weight, riding
style and terrain.
When tuning suspension, always make one change at a time and
write it down. This takes patience, but allows you to understand
how each change affects your ride. Keeping a record lets you
know what changes you have tried that work and suggests what
changes you might try.
3. RIDE HEIGHT ADJUSTMENT
(SAG)
Sag is the amount of shock travel that is used up as the rider
sits stationary on the bike. Proper sag determines the bikes
ride height and is taken in conjunction with the front fork.
This sag allows maimim tyre contact with the ground when riding
over rough and uneven terrain. You will find average that you
will use approximately, one third of the shocks travel, when
you sit on the bike. This will normally lower the bike by around
50mm.
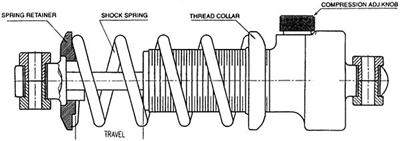
- To adjust the sag, turn the threaded spring collar away
from the spring and stop turning just as the spring feels
loose in the shock. This is zero pre-load.
- Without sitting on the bike, measure the distance from the
floor to the stem (front height) and floor to the seat (rear
height). Write them down.
- Then with a friend holding you while you sit in a normal
riding position on the bike. Measure those same distances.
The difference between to two measurements is your sag.
- To start, the sag for the front and rear should be the same.
- If the suspension sag is less than your bike manufacturer's
reccomendations, a softer spring rate is required. If the
sag is greater than reccomended, then turn the threaded collar
to decrease the sag until it is correct. Use a stiffer spring
rate if you reach the 2.5 turn limit. Do not exceed 2.5 turns
of the threaded collar.
4. SPRING RATE CHANGES (CHANGING
THE SPRING)
To fully utilise your rear suspension your shock should occasionally
bottom out. Check for bottom out while riding fast over aggressive
terrain. Bottoming out is a condition when all suspension travel
has been used up. If you are bottoming out too often or not
enough the overall spring rate should be changed. If you bottom
out too often, choose a stiffer spring rate or if you never
bottom out, choose a softer spring rate. To change the spring
rate follow the instructions below to remove the spring.
- Remove the shock from the bicycle.
- Clean the shock body threads.
- Turn the threaded spring collar towards the body eye, removing
sag (pre-load) from the spring. Then remove the spring retaining
collar from the spring. REMOVE THE DAMPING ADJUSTMENT KNOB
WITH A 2MM HEX WRENCH.
- Remove the spring.
- Install the new spring. Then reinstall the retaining collar
and damping adjustment knob.
- Set te sping pre-load (see "Ride Height and Spring
Pre-load Adjustment")
5. COMPRESSION ADJUSTMENT
The SL shock includes a compression damping adjustment
knob. The knob permits fine tuning of the shock's
rate of compression. The compression is quickest
when the adjustment knob is in the full counterclockwise
position and slowest when in the full clockwise
position.